Ever had that frustrating moment? You grab your trusty car vacuum, ready to tackle the aftermath of a road trip or just the weekly accumulation of crumbs and dust, only to find it’s wheezing and barely picking anything up. You glide it over the same spot three, four, five times, and the dirt just laughs back at you. Before you blame the vacuum itself, let’s talk about its unsung hero and most common culprit: the filter. Learning How To Clean Car Vacuum Filter is a game-changing skill that can restore your machine to its former glory. It’s the difference between a frustrating chore and a satisfying deep clean, and it’s simpler than you think. This guide will walk you through everything, turning you into a car-cleaning pro.
Why Bother with a Squeaky-Clean Car Interior?
Let’s be real, life gets busy. It’s easy to let the interior of your car slide down the priority list. But a clean car is so much more than just a good look. Think of it as your personal sanctuary on wheels. A clean interior reduces stress and creates a more enjoyable driving experience. More importantly, it’s about health. Your car’s cabin can be a breeding ground for dust, pollen, allergens, and other nasty particles. A powerful vacuum with a clean filter traps these irritants, significantly improving the air quality you and your passengers breathe in. Plus, maintaining a clean interior helps preserve your car’s resale value. It’s a win-win-win situation.
Know Your Tool: Common Types of Car Vacuums
Before we dive into the filter, it’s helpful to know what kind of machine you’re working with. Car vacuums generally fall into three camps:
- Corded Vacuums: These are the powerhouses. They plug into your car’s 12V outlet (the cigarette lighter) and offer consistent, strong suction. They’re great for deep cleans but the cord can sometimes be a bit of a hassle.
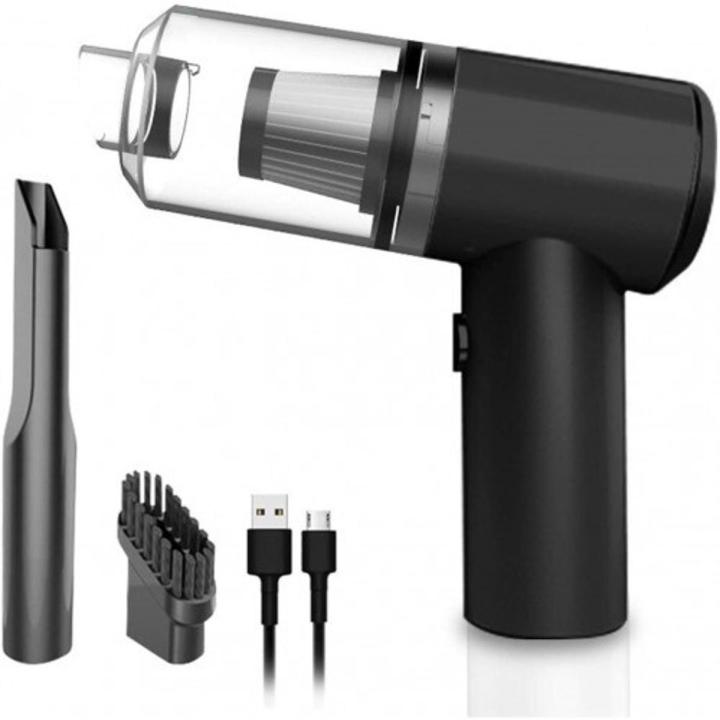
- Cordless Vacuums: The champions of convenience. These battery-powered wonders let you reach every corner of your car without being tethered. Modern models, like those we champion at Vacuum Mini, pack a serious punch in a compact size. Their performance, however, is directly tied to a clean filter and a charged battery.
- Handheld Vacuums: This category often overlaps with cordless, but it specifically refers to the compact, easy-to-maneuver design perfect for the tight confines of a car. They are the go-to for quick cleanups and regular maintenance.
The Main Event: How to Clean Car Vacuum Filter Step-by-Step
Alright, let’s get down to business. A clogged filter is like trying to breathe through a straw filled with dust—it just doesn’t work. It restricts airflow, which kills your vacuum’s suction power and can even cause the motor to overheat. Following these steps will bring it back to life.
Step 1: Safety First and Disassembly
Before you do anything, disconnect the vacuum from any power source. If it’s corded, unplug it. If it’s cordless, remove the battery pack. This is non-negotiable.
Next, locate and open the dustbin or canister. The filter is usually housed inside or right behind it. Most handheld vacuums make this super intuitive—a simple twist or the press of a button will open it up. Gently remove the filter. It might be a single piece or a two-part system with a mesh pre-filter and a finer inner filter.
Step 2: Identify Your Filter Type
This is the most crucial step because it determines your cleaning method. There are two main types:
- Washable/Rinseable Filters: These are often made of foam or a sturdy fabric-like material. They are designed to be cleaned with water.
- Non-Washable Filters (including most HEPA filters): These are typically made of a delicate, paper-like material. Getting these filters wet can ruin them completely, destroying their ability to trap fine particles.
How do you know which one you have? Check the user manual. If you’ve lost it, look for a small “washable” symbol (often a tap icon) on the filter’s plastic frame. When in doubt, treat it as non-washable to be safe.
Step 3: The Cleaning Process
For Washable Filters:
- Tap it Out: Vigorously tap the filter against the side of a trash can to dislodge all the loose dust and debris. Do this outdoors if possible to avoid making a mess.
- Rinse it Clean: Hold the filter under a stream of cool, running water. Don’t use any soap or detergent, as the residue can clog the filter’s pores or damage the material. Gently use your fingers to rub away any stubborn grime. Rinse until the water runs clear.
- Dry, Dry, Dry: This is the most important part. The filter must be 100% completely dry before you put it back in the vacuum. A damp filter can lead to mildew growth and can damage the vacuum’s motor. Let it air dry for at least 24 hours. Do not use a hairdryer or put it in direct sunlight, as high heat can warp the material.
For Non-Washable/HEPA Filters:
- Tap, Don’t Wash: Just like with a washable filter, the first step is to tap out all the loose debris into a trash can.
- Brush it Off: Use a soft-bristled brush (an old toothbrush or a small paintbrush works great) to gently brush away any remaining fine dust that’s clinging to the filter pleats. Be gentle to avoid tearing the delicate material.
- Use Compressed Air (Optional): If you have a can of compressed air, you can use short bursts from the inside of the filter blowing outwards to dislodge stubborn particles. Don’t hold it too close, as the pressure can damage the filter.
Step 4: Reassembly and Testing
Once your filter is clean and (if washed) completely dry, pop it back into the vacuum. Secure the dustbin, reattach the battery or plug it in, and give it a test run. You should immediately notice a significant improvement in suction. It’s a night-and-day difference!
Beyond the Filter: Tips for a Flawless Interior
Now that your vacuum is performing at its peak, let’s put it to good use.
- Work Top-Down: Start with the dashboard, doors, and console, letting debris fall to the floor. Vacuum the seats next, and finish with the floor mats and carpet.
- Use Your Attachments: That crevice tool isn’t just for decoration! Use it to get deep between the seats, into the door pockets, and around the gear shift. The brush tool is perfect for dusting vents and textured surfaces without scratching them.
- Don’t Forget the Hidden Spots: Slide the front seats all the way forward to vacuum underneath them, then all the way back. This is where you’ll find long-lost french fries and forgotten coins.
- Pre-Loosen Dirt: For ground-in dirt on carpets, use a stiff-bristled brush to agitate the fibers and loosen the debris before vacuuming. It makes a huge difference.
If, after all this, your vacuum is still giving you trouble, it might be a power-related issue. Learning how to fix car vacuum not turning on often involves checking fuses and the power cord, which is a separate but equally important piece of maintenance knowledge.
Choosing Your Next Car Vacuum: What to Look For
When it’s time for an upgrade, keep these key factors in mind to make a smart choice:
- Suction Power: Look for ratings in Air Watts (AW) or Pascals (Pa). Higher numbers mean stronger suction.
- Filter System: A multi-stage filtration system, especially one with a HEPA filter, is excellent for trapping allergens and fine dust.
- Battery Life & Charge Time: For cordless models, aim for at least 20-30 minutes of run time. Quick charge times are a huge bonus.
- Attachments: A good set of attachments (crevice tool, brush tool, extension hose) is essential for a thorough clean.
- Weight and Ergonomics: It should feel comfortable in your hand and be light enough to maneuver easily.
|
Our Picks for the Best Vacuum Mini in 2026
As an Amazon Associate, we earn from qualifying purchases.
|
||
| Num | Product | Action |
|---|---|---|
| 1 | WOLFBOX MF50 Compressed Air Duster-110000RPM Super Power Electric Air Duster, 3-Gear Adjustable Mini Blower with Fast Charging, Dust Blower for Computer, Keyboard, House, Outdoor and Car |

|
| 2 | WOLFBOX MF100 Electric Air Duster-150000RPM Super Power Cordless Air Duster, Rechargeable Brushless Motor Durable Blower, 3-Gear Adjustable Dust Blower for Computer, Keyboard, Outdoor, House and Car |
|
| 3 | Shark StainStriker Portable Carpet Upholstery & Area Rug Cleaner, Bonus XL Tool & Full-Size Cleaning Solution, Stain & Odor Remover, Perfect for Car Interiors, 4 Cleaning Tools, Nordic Blue, PX202BRN |
|
| 4 | BISSELL Little Green Mini Portable Carpet and Upholstery Deep Cleaner, Car/Auto Detailer, with HydroRinse Self-Cleaning Tool and 4\" Tough Stain Tool, Tea Green, 4075 |
|
| 5 | BISSELL Pet Hair Eraser Cordless Hand Vacuum, Lithium Ion, Home, Auto, and Pet Vacuum, Easy-Empty Dirt Bin, Upholstery Tool, Brush Tool, and Crevice Tool Included, 2390A |
|
| 6 | CRAFTSMAN CMXEVBE17250 2.5 Gallon 2.5 Peak HP Wet/Dry Shop Vac, Portable Shop Vacuum Wet and Dry with Filter Bag, Hose and Attachments for Cleaning in the Home |
|
| 7 | BLACK+DECKER dustbuster AdvancedClean Cordless Handheld Vacuum, Compact Home and Car Vacuum with Crevice Tool (CHV1410L) |
|
| 8 | BLACK+DECKER dustbuster QuickClean Cordless Handheld Vacuum, Car Vacuum Portable (HNVC215B10) |
|
| 9 | Fanttik Slim V8 APEX Car Vacuum, 4-in-1 Portable Mini Cordless Vacuum with 19000pa Suction Power, Type-C Charge, 2 Suction Modes, Handheld Vacuum for Small Jobs, Car, Office Desk, Keyboards (Black) |
|
Long-Term Love: Car Vacuum Maintenance
Cleaning the filter is step one. To ensure your vacuum serves you well for years, adopt these simple habits.
“Most people wait until their vacuum stops working to pay attention to it,” notes Mark Richardson, a veteran auto detailer. “But 10 minutes of preventive maintenance a month—emptying the bin, cleaning the filter, and checking the brush head—will double its lifespan and performance. It’s the easiest thing you can do.”
- Empty the Bin Often: Don’t wait until the dustbin is completely full. An overfull bin reduces airflow and puts a strain on the motor. Empty it after every one or two uses.
- Check the Brush Head: If your vacuum has a motorized brush, regularly check it for tangled hair, string, and fibers. Use scissors to carefully cut them away.
- Store It Properly: Keep your vacuum in a clean, dry place. Avoid extreme temperatures, which can degrade the battery and plastic components over time.
Frequently Asked Questions
How often should I clean my car vacuum filter?
For optimal performance, you should tap out the dust after every use and give it a thorough cleaning (washing or brushing) once a month, or more frequently if you use it heavily or have pets.
What happens if I use a wet filter in my vacuum?
Using a damp or wet filter is a big no-no. It can lead to musty, moldy smells, and the moisture can be sucked into the motor, causing irreversible damage and electrical shorts.
Can I use soap or detergent to clean my washable filter?
It’s best to avoid soaps. They can leave behind a residue that clogs the microscopic pores of the filter, reducing its effectiveness. Plain cool water is all you need.
My vacuum still has weak suction after cleaning the filter. What’s wrong?
First, double-check for clogs in the hose or nozzle. If it’s clear, ensure the dustbin is properly sealed. If suction is still poor, the motor may be wearing out, or it might be time to replace the filter entirely, as they do wear out over time.
Is a HEPA filter really necessary for a car vacuum?
While not strictly necessary for everyone, a HEPA filter is highly recommended for allergy sufferers or those with pets. It traps 99.97% of fine particles like pollen, pet dander, and dust mites, leading to much cleaner air inside your car.
A Clean Finish
Mastering how to clean car vacuum filter isn’t just about maintenance; it’s about empowerment. It’s a simple, five-minute task that unlocks the full potential of your cleaning tool, transforming your car’s interior from a space of transit to a place of pride. A clean filter means powerful suction, and powerful suction means a truly clean, healthy, and enjoyable environment for every drive. So next time your vacuum seems a little weak, you’ll know exactly what to do. What are your go-to tricks for keeping your car’s interior spotless?